Friday, August 26, 2011

Not With This Exercise

https://rcnaegle.reliv.com
http://hop.clickbank.net/?myguymygir/betteru

Look for Free ebooks


One-Legged Glute Deadlifts - Do Your Thighs Always Take Over When
Training Glutes? Not With THIS Exercise...


By Nick Nilsson


One of the biggest reasons people have a difficult time getting results in the glutes is that the quads tend to
take over. This exercise takes the quads completely OUT of the
movement, putting MAJOR tension on the glutes.


If you have trouble feeling your glutes working in any of the lower body exercises you do, THIS is an exercise you're going to get a lot out of...it targets the glutes with minimal thigh involvement and it could be your key to a WAY better butt!
This one looks suspiciously like a Bulgarian Split Squat but without the squatting.
The Bulgarian Split Squat exercise is done with your back leg up on a bench then you come down in the lunge position (aka split squat).
With THIS new exercise, however, you're going to basically be doing a one-legged stiff-legged deadlift with your back leg up on the bench.
I was actually quite amazed at how strongly this one targeted the glutes...the best part is, it hits the glutes without involving knee flexion to any substantial degree.
What THIS means is that you can build bigger glutes (and/or maintain glute size) when you have knee problems or injuries that prevent you from squatting or lunging.
Now you have no excuses...unless you've got back problems, too, then you're totally @&#$ed, of course (just kidding :)
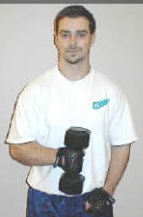
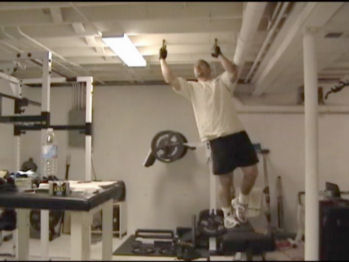
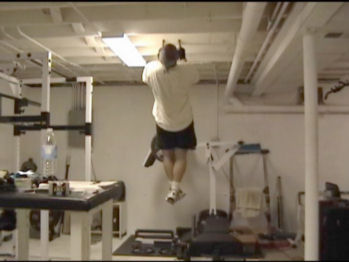
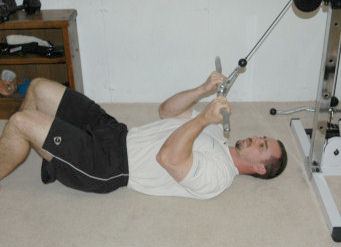
So here's what the exercise looks like...you'll need two dumbells and a bench for this one. Set the dumbells in front of the bench (I'm using a couple of 85 lb dumbells - start lighter than this when you try these the first time).
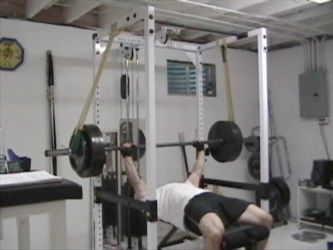
Now set your ENTIRE SHIN on the top of the bench. You'll need this for some degree of stability. We're not trying to make this exercise unstable, per se. What we're trying to do is get your body in the right position to force the glutes to activate.
You may need to slide the dumbells forward a bit. Set your front foot in between the two dumbells, get into position on the bench (like you were going to do that split squat movement). Both knees should be bent but held in that same position throughout the exercise.
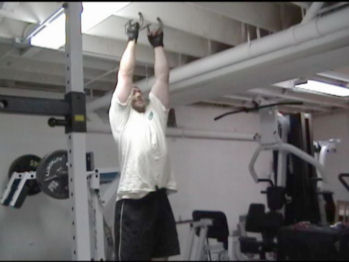
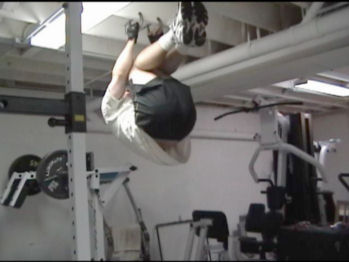
Bend forward and grab the dumbells. Keep your core tight.
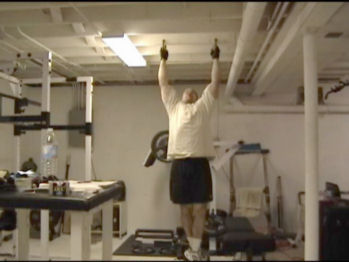
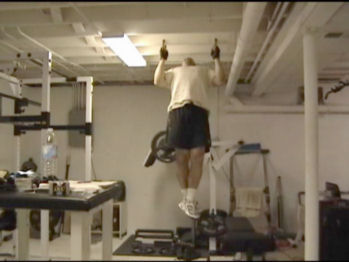
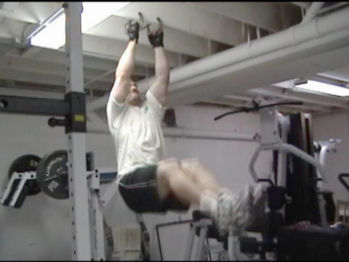
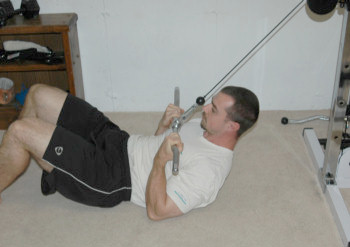
Now pick the dumbells up off the floor. The pressure should be on the heel of your front foot and your glute should be feeling it. Your glute will not only be providing the hip extension that gets you to the upright position, it's also contracting isometrically to maintain that bent-knee split position - double whammy!
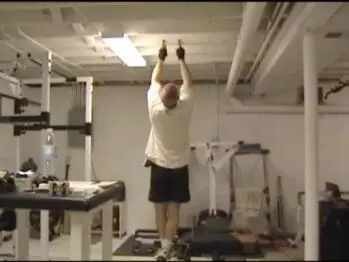
Come all the up until your torso is vertical then lower the dumbells slowly back down and set them on the ground. Repeat the movement, lifting the dumbells off the ground - setting them down allows you to reset your body position and keep your lower back well stabilized.
Do your reps on one leg then switch legs. I prefer lower reps with this exercise since the glutes are powerful muscles and need to be hit hard (5 to 7 reps per set is good)

The first time you do it, don't go too heavy though, as you will want to bring your lower back up to speed before pushing to use heavier weight.
It's important to remember, you're setting the dumbells completely on the floor inbetween reps. Breathe out on the way up and keep your core tight. Try to keep an arch in your lower back throughout the movement as well.
Once you've done your reps on one leg, switch to the other leg.
This exercise increases lower back and glute involvement significantly. You're maintaining a bend in the front leg and only moving at the hip, which basically utilizes the glutes from the OTHER direction (known as hip extension). Instead of pushing down against something, you're using the glutes to pull your upper body up.
Because there is no active knee flexion, people with knee issues don't experience the same issues as with lunging or squatting exercises but still get excellent glute, hamstring and lower back work.
So if a better butt (or a bigger butt!) is something you've always wanted but found your thighs always took over the exercises you were doing for that purpose, THIS is an exercise you'll want to try out.
To see this exercise in action, go to:
http://hop.clickbank.net/?myguymygir/betteru&l=1149
And if you're interested in a full-on glute-building PROGRAM, I've got just what you need:
This book is PACKED with exercises, programs and training techniques for building larger, firmer rounder glutes FAST.

------------------

Nick Nilsson has a degree in Physical Education and Psychology and has been innovating new training techniques for more than 20 years. Nick is the author of a number of bodybuilding books including "Gluteus to the Maximus - Build a Bigger Butt NOW!", "Muscle Explosion! 28 Days To Maximum Mass", "Metabolic Surge - Rapid Fat Loss," "The Best Exercises You've Never Heard Of," and "The Best Abdominal Exercises You've Never Heard Of", all designed to maximize the results you get for the hard work you put into your training.

Be sure to grab your FREE copy of Nick's 30-day "Dirty Little Secret Program for Building Muscle and Burning Fat FAST," available at http://hop.clickbank.net/?myguymygir/betteru!

https://rcnaegle.reliv.com

Thursday, August 25, 2011

Developing the Glutrs


"Dead" Treadmill Cardio For Developing the Glutes and Dropping Fat FAST

By Nick Nilsson


Generally speaking, "normal" treadmill training is almost completely useless for the glutes. And I'll tell you why...


The function of the gluteus maximus muscle is to extend the hip...this essentially means bringing the leg backwards.

The treadmill tread (when it's running) physically BRINGS your leg backwards with no help from the glutes, taking away all the function of the glutes when you're on it.

So every time you do your cardio on the treadmill, you're overworking your hip flexors (which are the muscles that work to bring the leg back up in front of you) and underworking the glutes.

This can actually make posture and lower back problems WORSE (especially if you don't stretch the hip flexors after working on the treadmill) by heigtening the imbalances of the muscles of the hip.

And if you already find you have trouble feeling your glutes working when you do lower body exercises, "normal" powered treadmill training is about the WORST choice of cardio machines for you. It's doing nothing to help activate the glutes.

So here's the dead-simple tip for the next time you do anything on the treadmill...

Turn it off.

That's it!

When you use the treadmill without it being powered, what do you think has to supply the energy to move that tread?

Your GLUTES.

It's a DIRECT action for the glutes (and the rest of the lower body) that has you actually accomplishing some WORK rather than just moving your legs along for the ride.

This is also the reason you can run and walk so much faster and easier on the treadmill...the machine is doing the work of moving your legs backwards and you're not required to use the BIG muscles of the glutes to actually propel your body forward.

And the most IRONIC part of it?

This technique actually works better on a machine that normally IS powered. I'm sure you've heard of or seen treadmills that aren't powered...these have much less resistance to the tread being moved backwards because they want people to actually use them (you know what I mean :).

When you're using a machine that is normally powered, there is significantly more resistance to the belt moving without that outside power and you're going to get a GOOD workout out of it.

So next time you use the treadmill, leave it off. Set your hands on the bar and lean forward like you're about to push a car. And start walking. Use GLUTE power to get the tread moving and keep it moving.

You're going to get a MUCH better glute workout and cardio workout by doing this.

On a side note, if you find the resistance is a bit too much on the treadmill, turn it back on and set it to an incline. Then turn it back off again and do the walking on a slope.

By walking on an incline like this, you actually make the exercise easier. Gravity is going to give you some assistance in moving that tread backwards but you'll still need a decent amount of push to keep the tread moving.

Once you've developed a feel for what it takes to move the tread on your own, then you can progress to some interval training and running.

The idea is exactly the same as with walking...get your hands on the bar and PUSH.

With the running, I recommend doing it as interval training, not just because it's harder but to MAKE it harder.

You see, once you get the tread moving, it takes less effort to KEEP it moving. So what I do is run for about 5 to 10 seconds then slow down then run again, then slow down.

What this does is increase the inertia of the tread, making you have to push harder again to get it up to speed again. This really increases the workload on the glutes and also the cardio training you get from this dead treadmill training.

If you do a lot or all of your cardio on the treadmill, you're going to be in for a BIG surprise when you turn it off and use it :)

It's going to wake up your glutes and double or even TRIPLE the cardio workload on you.

Now, what would this great training tip be without a shameless promotional plug for my book "Gluteus to the Maximus - Build a Bigger Butt NOW!"...a book designed specifically for glute training and nothing but glute training.

Ladies, click here to read about it
http://hop.clickbank.net/?myguymygir/betteru&l=222
Guys, click here to read about it.
http://hop.clickbank.net/?myguy mygir/betteru&l=221

This cardio exercise goes PERFECTLY with the program. In fact, using this unpowered treadmill walking or running can actually HELP build the glutes because of the active resistance on the glutes and because of the tremendous bloodflow being forced into the glutes with every step you take (and increased blood supply is critical for developing any stubborn muscles).

------------------

Nick Nilsson has a degree in Physical Education and Psychology and has been innovating new training techniques for more than 20 years. Nick is the author of a number of bodybuilding books including "Gluteus to the Maximus - Build a Bigger Butt NOW!", "Muscle Explosion! 28 Days To Maximum Mass", "Metabolic Surge - Rapid Fat Loss," "The Best Exercises You've Never Heard Of," and "The Best Abdominal Exercises You've Never Heard Of", all designed to maximize the results you get for the hard work you put into your training.

Be sure to grab your FREE copy of Nick's 30-day "Dirty Little Secret Program for Building Muscle and Burning Fat FAST," available at http://hop.clickbank.net/?myguymygir/betteru!

This cardio exercise goes PERFECTLY with the program. In fact, using this unpowered treadmill walking or running can actually HELP build the glutes because of the active resistance on the glutes and because of the tremendous bloodflow being forced into the glutes with every step you take (and increased blood supply is critical for developing any stubborn muscles).

------------------

Nick Nilsson has a degree in Physical Education and Psychology and has been innovating new training techniques for more than 20 years. Nick is the author of a number of bodybuilding books including "Gluteus to the Maximus - Build a Bigger Butt NOW!", "Muscle Explosion! 28 Days To Maximum Mass", "Metabolic Surge - Rapid Fat Loss," "The Best Exercises You've Never Heard Of," and "The Best Abdominal Exercises You've Never Heard Of", all designed to maximize the results you get for the hard work you put into your training.

Be sure to grab your FREE copy of Nick's 30-day "Dirty Little Secret Program for Building Muscle and Burning Fat FAST," available at http://hop.clickbank.net/?myguymygir/betteruhttp://hop.clickbank.net/?myguymygir/betteru!!

Wednesday, August 24, 2011

10 Things You Can Do Right Now

I've got some great chest training info lined up for you here, not only right now but in the future, as I'll be posting new stuff regularly.
Thanks again for signing up and let's get right to it!
Nick Nilsson
Author of "The Best Chest Exercises You've Never Heard Of"


10 Things You Can Do RIGHT NOW To
Increase Your Bench Press FAST


The flat barbell bench press...the lift that everyone wants to know how much you can do when they find out you train. So you want to get your numbers moving in the right direction again? These 10 quick tips will make a difference in your strength and boost your bench FAST.

Keep in mind, these tips are coming from someone who has almost NO genetic gifts as far as bench press is concerned (bad shoulders, long arms). It's among my weakest lifts and I have to struggle for every single pound I add onto it. Yet with those limitations, using the tips I'll share with you below, I've managed to work up to a maximum single at 350 lbs. So it CAN be done!


1. Work your Rotator Cuff muscles


Yes, this is completely unglamorous but it has the potential to add 20 to 30 pounds to your bench press in a matter of weeks. The reason? The Rotator Cuff muscles are the four small muscles that stabilize the humerus (your upper arm bone) in the shoulder socket.

Most people rarely, if EVER, work the Rotator Cuff but a couple of sets at the end of each workout can really make a HUGE difference in your bench press by helping to stabilize the shoulder joint.

The exercise that I use is one I call the "3 In 1 Rotator Cuff Raise." It's an exercise I came up with to work all 3 major planes of movement that the Rotator Cuff muscles operate in in one basic movement. It's very effective and very time-efficient. Two sets of 8 reps of this at the end of each workout is all you need.


2. Get your grip-width right


Where you grip the bar can make or break your bench press before you even do a single rep. If you grip the bar in too close, you're putting more stress on the triceps, which limits your pushing power and increases the distance you have to press the bar. If you grip the bar too wide, you do decrease the distance the bar travels but you put excessive stress on the shoulder joints.

So what is the best place to grip the bar? This is best determined with no weight on the bar at all and with somebody watching your form. Lie down and take the bar off the rack and lower the bar to your chest. Have your spotter eyeball your forearms. At the bottom of the press, your forearms should be perfectly vertical. THAT will give you the greatest pressing power as you won't lose any power moving inside or outside.

It's the same concept as throwing a punch - if the bones of the arm aren't lined up properly when it connects, you lose a lot of power at impact.


3. Learn how to breathe


When you're doing a heavy press, trunk stabilization is much more important than when you're doing lighter, higher-rep training. You need a strong, solid base to push off of to really move the most weight.

When doing a heavy lift for only a few reps, breathe in deeply on the way down, inflating your chest as much as possible (this has the dual effect of increasing the stability of your trunk AND decreasing the distance the bar must travel, which is a bonus!). But as you press the bar off your chest don't immediately blow out all your air in one big blow. That will destabilize the chest and weaken the base you're pushing from.

Think of it this way...it would be like trying to do a dumbell press on the Swiss Ball as somebody is letting the air out of it FAST!

So as you start to press the weight, blow your air out through pursed lips. Basically, pretend you're blowing up a really thick balloon. You want to keep your breathing muscles in your rib cage absolutely solid as they very slowly force the air out. This keeps your trunk solid and stabilized as you press, which is critical. The moment you lose that stability, you lose the lift.


4. Don't neglect back training


Back training is important to your bench press in 3 major ways.

Remember what I said about stability in the previous point? Your back makes up a BIG portion of that base that stabilizes your body. The wider the base, the bigger the structure it can support (i.e. more weight). A comparatively weak back will reduce the amount of weight you can bench.

The second point is thickness. The thicker your back, the shorter the distance the bar has to travel and the more weight you'll be able to lift. Look at how thick the torsos of the best bench pressers in the world are - they have huge barrel chests, thick backs and relatively short arms - their range of motion is probably about HALF of what a "normal" person's range of motion is with the bench press. The thicker your back, the shorter the range of motion and the more weight you'll be able to press.

The third point is muscular balance. If you're constantly doing pushing movements, your body will overdevelop those pushing muscles, which will lead to unnatural shortening and potential weakness. You MUST work the back muscles to pull everything into proper alignment. Walking around with your shoulders hunched forward and your arms bouncing around in front of you doesn't look cool - I can promise you that.


5. Don't forget to press with your legs, too


Leg drive is VERY important to maximizing your bench press strength on maximum lifts. When you set your feet for benching, don't just place them anywhere and let nature take its course. Set your feet solidly on the ground and bend your knees a little past 90 degrees.
Here's why...when you're at the bottom of the bench press, driving with the legs can help you get that weight moving. You can demonstrate this to yourself by lying on the flat bench and setting your feet on the ground.

Now think of how you'd need to set your feet if you wanted to use your feet/legs to slide yourself up the bench.

THAT is what you do when you drive with your legs - you basically try and use your legs to slide yourself up the bench. But because the weight is holding you down, that force goes to helping push the weight up.

This leg drive is used at the bottom of the press to get the weight moving and makes a HUGE difference with getting big weights moving.


6. Get those shoulder blades squeezed together


This goes back to trunk stability. If you're not consciously and religiously squeezing your shoulder blades together when you set yourself up on the bench press, you're instantly putting yourself at a disadvantage.

To do this, lie down on the bench and grab the bar. Lift your body up off the bench then try and touch your shoulder blades together behind your back. Get them tucked in as tight as possible. When you set yourself back down, you'll find you're not only more stable on the bench but your shoulders are in a stronger pressing position AND your torso is actually a little thicker (which means shorter range of motion)!


7. Do partial-range training to strengthen your connective tissue


One big thing that's often missing in the training routine of a person looking to maximize strength is a focus on connective tissue training. You can build huge, strong muscles but the movement is only as strong as the weakest link. If that weakest link is connective tissue, best case is it will limit the amount of weight you can lift. Worst case, you'll snap your tendons when your muscles move weights that your connective tissue can't handle!

So how do we strengthen connective tissue? That requires VERY heavy weight, the kind that can only be used with partial-range training like lockouts in the rack.

For building up your connective tissue specifically for bench press, DEFINITELY work on rack lockouts and static holds with monster weight.

Personally, I really enjoy lockout training because you can use a LOT of weight (up to two times or more of your one rep max!).


And, here's the cool thing...I'll have a link below where you can learn exactly how to do the Lockout Partial Bench Press!


8. Use training bands


Bands are one of the most useful training tools you can use with the bench press. There are two main ways to go...working AGAINST the bands to increase explosive power and working WITH band assistance to move more weight and more closely mimic the strength curve of the bench press (harder at the bottom, easier at the top).

When using the bands to work on explosive training, you attach them to something solid on the floor and then to the bar. You use a lighter weight on the barbell for these. Then, when you lift, you explode up as fast and as powerfully as you can against the bands. The bands stretch as you come up, slowing the bar so your muscles don't have to. This teaches your muscles to fire at a much faster rate.

The other method is to use the bands for assistance (called Reverse Band Bench Press - it's one of the exercise found in the "Best Chest Exercises" book, actually).


With this technique, you attach the bands to the top of the rack and to the bar below. As you lower the weight, the bands stretch, making the bottom of the press easier by removing some of the resistance. As you press up, the bands lose tension, making you press more of the weight yourself, which exactly mimics the mechanics of the bench press.

Both of these techniques are great additions to your bench press training routine. You can grab bands here:


9. Don't forget about decline bench press


One of the best things about the decline bench press is that you can use a bit more weight on it than you can on the regular flat bench due to the change in biomechanics and somewhat decreased range of motion. Working with heavier weight is good in two ways - mentally and physically.

Mentally, it helps prepare your mind for working with heavier weight. Physically, it helps prepare your body for handling heavier weight on the flat bench.


10. Do your bench pressing in the power rack


Even if you have access to a regular bench press station at your gym, I HIGHLY recommend doing your bench pressing in the rack. Why? Two reasons.

The first is safety. You can easily set the rails to just slightly below the bottom-most position of your bench press. If you can't finish a rep, you just set the bar on the rails, roll the bar forward and slide yourself out from under it. No harm done, no spotter necessary. You can't do that on a regular bench press station!

The second is the freedom to REALLY PUSH YOURSELF without fear of dropping the weight and not being able to get out from under the bar. When you're in a regular free bench press station, there is always that nagging fear that if you don't make a lift, you're going to have the bar come down on you.

When you do your pressing in the rack with safety rails set, that will NEVER happen and you can really free yourself to push things to the limits without having to worry about crushing yourself under the bar!

I have ALWAYS found it ironic that the station where people do one of the most dangerous exercises in the gym (and quite often lift more weight than they can safely handle on it!) is the one station that has almost NO safety measures built into it!

Think about it this way...when was the last time you saw somebody get crushed under a barbell curl, yet how many times do you see people doing curls in the rack while doing bench presses on a free station!

So basically, set yourself free and do your pressing in the rack. You can push yourself harder and fight through those sticking points without worrying about getting stuck under the bar if you don't get it.


Conclusion:

If you want to maximize your bench press, put these tips to work. You'll starting noticing a very big difference in how much weight you can lift almost immediately AND in the long-term!


CLICK HERE to learn how to do the Lockout Partial Bench Press to increase connective tissue strength and DESTROY your bench press plateaus!

Fat Loss

         Excerpt #1 - Fat Loss Circuit Training   Http://hop.clickbank.net/?myguymygir/betteru&1=1174

This program challenging but very effective! It's very simple
once you get the hang of it but it's one of the most demanding
styles of training you can do.

---

For a sample workout to follow, taken directly from the book,
please click on the following link:

http://www.fitstep.com/metabolic-surge/course/day1.htm

---

If you're familiar with normal circuit training (with timed
light-weight intervals), please put aside any notions you
might have of how this program works.  You will not only be
harnessing the muscle-building and metabolism-stimulating
power of intense, full-set weight training (NOT the typical
light-weight, timed intervals of normal circuit training),
you will also be incorporating the great calorie-burning
effects of cardiovascular training as well. 

The proper combination of the two into one workout is, quite
simply, phenomenal for fat burning.

In order to use Fat Loss Circuit Training, you will need access
to both weight equipment, cardio equipment and/or benches
or stairs, preferably located in fairly close proximity to
each other.

This type of training is harder to do in a crowded gym as it
will involve you moving back and forth quickly between
different pieces of equipment. If someone is waiting to use
your cardio machine the moment you step off, it will defeat
the purpose of the workout. This technique is best used in a
fairly uncrowded gym where you have more freedom to use
equipment or, better yet, in a home gym with weights and
cardio equipment and no one waiting for anything!

If you do work out in a crowded gym, I will tell you exactly
how to get around it. If you still can't find a way to execute
this style, follow the alternate instructions listed in the
Program.


How It Works:

- Essentially, this is combined circuit/interval training.

- You will be going back and forth between your weight
   training exercises and one cardio exercise for the
   duration of the workout.

- Your rest period for weights will be your cardio and your
   rest period for cardio will be your weights.

- You will be doing some sort of activity for your entire
   workout without any break!

This combination is very effective for a number of reasons:

- It forces your body to burn calories continuously during
   the workout.

- It utilizes resistance training and cardio training so you
   get all the benefits of both in one workout.

- By forcing your body to work like this, you dramatically
   increase your metabolism leading to increased fat burning
   long after the workout (more so than either weights or
   cardio alone).

- It saves time - you get both your weights and cardio in
   the same amount of time as your regular workout.

- You will still be able to use heavy weights in your weight
   training, helping to preserve muscle mass.


How To Do It:

Step 1 - Set Up

For the most efficient workout possible, have most or all of
your exercises pre-set and ready to go. The less time you
spend on preparation during your workout itself, the more
effective that workout will be, especially since you want to
be basically keeping continually active throughout the entire
workout. You can use any type of cardio that is convenient
and enjoyable to you, be it a machine, stairs stepping, or
even a skipping rope.

If you are working out in a crowded gym, try to claim an
area for yourself and focus on dumbell exercises. You won't
have to wait in line to use any weight machines that way.

If you don't have access to convenient cardio machines,
you're going to have go low-tech. You'll need to do stair-
stepping (stepping up two stairs then back down works well),
bench-stepping (step up onto a flat bench or Step platform
then back down) or rope-jumping (be sure you're not close
to anyone if you choose this). These approaches work just as
well as cardio machines and allow you to perform this
training style in a busier setting.


Step 2 - Warm-up

Do a few minutes of low-intensity cardio as a warm-up. You
may wish to do a few light sets of a few of the exercises
you'll be working with before you start into it though. Don't
tire yourself out, just get a light sweat going.


Step 3 - Start with 30 - 40 seconds of moderate intensity cardio.

This could be setting the stair machine to a level that is
not easy but is not so challenging that you're going to
exhaust yourself right away. Watch the timer on your machine
and go for approximately 40 seconds (I say approximately
because there will generally be a slight lag time when you
step on and off).

Many cardio machines have a "rest period" feature where you
can leave the machine on and it will not erase your program
while you have stepped off. Normally, this is about 2 minutes.
This should be enough time to complete your weight set.

If you are using a machine such as a treadmill or stair
machine that you will leave on with the timer running, just
watch the time counter on the machine and keep track of when
you get on it to get the designated period. It may require a
little mental math! You can also use your own stopwatch or
timer on your watch to keep track (this is easier). Start the
timer when you start the cardio.

Many machines also have a feature that runs through a series
of time periods. I've found on the Stair Machine, if you set
the length of the session to 20 minutes, this results in a
40 second time period making it perfect for judging your
cardio periods.


Step 4 - Do a set of weights.

Go as quickly as you can to your first exercise. Do a set of
the first exercise on your program for the day. Do this with
no rest, going from the cardio immediately to the weights.
Do all your reps until you approach muscular failure. While
this is definitely still intense weight training, don't push
yourself to the edge as you would in your regular training.
Due to the high training volume we'll be doing in this
program, pushing to failure on every set will compromise
muscle recovery.

Keep the do-or-die rep in you on every weight set. Stop one
rep before it. You'll learn to know when it's coming.


Step 5 - Go right back to the cardio.

Get back on the treadmill and do another 40 seconds of
moderate-intensity cardio.


Step 6 - Repeat the cycle for the duration of the workout.

You will be going back and forth continuously between cardio
and your weight training exercises, using the cardio as the
rest period between your weight sets. What this means is
that over the course of your workout, you'll be burning
calories via cardio and weights AND you'll be working your
muscles with intense, heavy weight training as well. It's
tough training but very effective!


Notes:

- As you improve your cardio ability, you can choose to
   increase the intensity of your cardio training between
   sets. You may wish to start at a lower level and gradually
   increase the resistance over the course of the workout or
   start at a higher level and keep it there. It is perfectly
   acceptable to keep it at a steady, moderate level, however.

- This Fat Loss Circuit technique can be used with nearly
   any form of cardio exercise as long as it is convenient to
   go back and forth with the weights. The real key here is
   to maintain activity for the entire workout.

- Keep your workouts to no more than 45 minutes at the very
   most when doing this type of training (the programs in this
   book are designed to stay below that time range). Any more
   than that and you will be breaking yourself down too much.
   It's an extremely demanding form of training as you'll be
   working every major energy system in your body. You will
   also find it will crank your metabolism up pretty seriously!


For a sample workout to follow, taken directly from the book,
please click on the following link:

http://www.fitstep.com/metabolic-surge/course/day1.htm

You will be able to print this workout and take it to the gym
with you to try out.

Click this link to order "Metabolic Surge" right now!

--------------------------------------------------------------------------

http://www.fitstep.com/metabolic-surge/purchase-metabolic-surge.htm

---------------------------------------------------------------------------

Your new body is waiting for you!

-----

"Well, you have truly outdone yourself this time, Nick. It is
truly the most awesome workout program I have ever seen! It
is totally what I have been looking for at this stage of my
training because everything has been so boring for me."

"I have been searching for something that's challenging and
gets me results fast but still keeps my muscle and you have
just invented the best program ever. For the first time in a
long time, I am so excited to train again I can barely contain
myself to wait the four days of rest so I can start!"

Charleen Pompu, N.S.C.A Certified Personal Trainer & Gym Owner
Creston,B.C. Canadahttp://hop.clickbank.net/?myguymygir/betteru&1=1174

By Nick Nilsson

Pull-Ups are one of THE single best back (and upper body!) exercises you can do. But what do you do if you train at home and don't have access to a pull-up bar? Simple. You do this...


So you're training at home and you don't have a place to put a chin-up bar. Or you don't have a power rack with a chin-up bar on it.
No problem!
I've got a couple of simple items that are going to totally change the way you look at hardware stores…
What are those items?
C-clamps…
Your basic woodworking C-clamps, available at any hardware store in the world.
All you have to do is clamp those onto something solid in your house (or outside) and you've got yourself a couple of chin-up handles! I have two clamps (the size I use is 4 inch - it gives you the perfect size handle for gripping on) attached to a rafter in my basement.
It's a simple matter of clamping those on somewhere high up then doing pull-ups on them!
If you're worried about damaging the surface with the clamps, just slide a couple of smaller pieces of wood in between the clamping surfaces to spread out the load.
c-clamps for pull-ups at home
This setup is not only cheap and easy but very versatile. Because you can clamp on anywhere you like, you can change the grip width very easily. You can start with close grip chins then move a clamp out further and do neutral-grip wide-grip pull-ups.
You can set the clamps on two different rafters and do regular wide-grip pull-ups. Heck, you can shift the clamps around to almost any position and do a HUGE variety of mixed-grip pull-ups. The options are many.
At this point, I'm sure you're thinking "sounds great, but are they solid?"
Definitely.
I weigh about 200 lbs and once solidly clamped on, mine did not budge the slightest bit. And this was with me TRYING to pull them loose. I even did pull-ups on just ONE clamp and it didn't budge.
So if you train at home and have been looking for a pull-up solution, head over to the hardware store a.s.a.p. and go grab your C-clamps!
c-clamps for pull-ups at home
This pictures shows the clamps on the rafter.
c-clamps for pull-ups at home
Stand up on a bench or chair then grab the clamps.
c-clamps for pull-ups at home
Now you're set to do neutral-grip pull-ups!
c-clamps for pull-ups at home
Top position.
c-clamps for pull-ups at home
Here's a further-away look.
c-clamps for pull-ups at home
Grip the clamps like handles.
c-clamps for pull-ups at home
Start position.
c-clamps for pull-ups at home
Top position.
c-clamps for pull-ups at home
This is a closer grip version - the distance between the clamps is about 6 inches.
c-clamps for pull-ups at home
Top position.

Hanging Leg/Knee Raises
You can also perform hanging leg raises and knee raises (as well as
any other hanging exercise) with this clamp set-up.
Hanging Leg/Knee Raises at homeanging Leg/Knee Raises at home
anging Leg/Knee Raises at home

Crunch Pulldowns

Crunch Pulldowns For Targeting
Your Six-Pack Abs


:


The Crunch Pulldown is a very simple exercise to do, perfect for hitting the abs in a way they're not used to at all. For this one, all you need is a high pulley and a bar attachment.
Hook up the bar to the pulley and set a moderate weight on it. You don't want to go too heavy or you won't be able to perform the exercise. Once you do it once, you'll get a better idea of how much weight you can use.
Lie on your back under the pulley. In the picture, I have an adjustable-height pulley and have it set a few feet off the ground. If you have just a regular high pulley that you can move, it'll work exactly the same but you'll have to grab the bar THEN lie down in position rather than lying down first then reaching up and grabbing the bar.
the bar.

Crunch Pulldowns For Targeting Your Six-Pack Abs
So once you're on your back (with your head diretly under the pulley), pull the bar down so that your elbows are bent about 90 degrees. Your knees should be bent 90 degrees and feet placed flat on the floor for this one. The bar should be 8 to 12 inches above your body. That's the start position.
Now crunch up. But here's the kick - as you're crunching up, don't use the weight to help pull yourself up...instead, perform a pulldown movement as you're crunching up. To do this, just pull the bar down towards your lower chest until it touches your lower chest.
the bar.

the bar.
Crunch Pulldowns For Targeting Your Six-Pack Abs
So not only do you get the normal tension from the crunch movement, you're also getting tension on the abs using the weight from the pulldown movement. This really fires up the six-pack muscles to help them stand out. It's a unique angle of resistance that your abs have probably never felt before!
Crunch Pulldowns For Targeting Your Six-Pack Abs